Overview
⚠️ Steps 4-6 are exclusive to payment pages. If you are building a non-payment page, skip to the Enable User Interface Section to configure your <up-from-pricing> components.
The callback handler is a single function that keeps you informed about everything happening in the Flex Pay payment flow. It tells you when an offer is available, when the customer completes the application, and when the virtual card is ready to charge.
You define one function, and the SDK calls it whenever the payment status changes.
Integration Details
In Step 2, you passed onChange: myOnChangeCallback in the payment page initialization. Now define that function:
⚠️ The comments below reference concepts covered in the next steps. That is expected — you will fill in the implementation as you progress.
function myOnChangeCallback(response) {
   var statusHandlers = {
      OFFER_AVAILABLE: function(){
        // STATUS: Pay Monthly offer is available for this orderInfo
        // 1. show Pay Monthly selector
        // 2. enable Pay Monthly selector
        // 3. disable Purchase/Book button until application is completed
        //
        // The <up-from-pricing> component inside the selector renders
        // the monthly price automatically — no DOM manipulation needed.
      },
      TOKEN_AVAILABLE: function(){
        // STATUS: Customer completed the Flex Pay application and is approved
        // 1. enable Purchase/Book button
        // 2. retrieve the virtual card ONLY when the user clicks Purchase/Book
      },
      TOKEN_RETRIEVED: function(){
        // STATUS: Virtual card token is ready
        // 1. process payment using the token (Flex Pay virtual card)
      },
      OFFER_UNAVAILABLE: function(){
        // STATUS: Pay Monthly offer is not available for this orderInfo
        // 1. keep the Pay Monthly selector visible (recommended)
        // 2. rely on <up-from-pricing show-error="true"> to explain why
        // 3. optional: if your UX requires it, you can switch to another method
        //    but avoid forced focus changes when possible (accessibility)
        //
        // The <up-from-pricing show-error="true"> component displays
        // "NOT AVAILABLE" with an error tooltip showing the reason.
      },
      SERVICE_UNAVAILABLE: function(){
        // STATUS: Flex Pay API is unavailable
        // 1. hide Pay Monthly selector entirely
      }
   };
   statusHandlers[response.status]();
}
Response Format
Every callback receives a response object with this structure:
{
  "status": "string",      // Current status in the Flex Pay flow
  "reasons": "array|null", // OFFER_AVAILABLE: array of codes,
                           // TOKEN_RETRIEVED: array of codes,
                           // OFFER_UNAVAILABLE: NULL
  "token": "object|null"   // Flex Pay virtual card for payment processing
}
📘 For detailed explanations, see: payment status, token reference, and error codes.
From Pricing on Payment Pages
If your payment page displays <up-from-pricing> components (for example, inside a Pay Monthly Selector), the component manages both the pricing display and the error state internally through Shadow DOM:
- Offer available → component renders the monthly price automatically
- Offer unavailable +
show-error="true"→ component renders "NOT AVAILABLE" with an error tooltip - Offer unavailable +
show-error="false"(default) → component hides itself
Your callback handler focuses on selector-level behavior: showing/hiding the selector container, managing the purchase button, and handling tokens. The pricing component handles its own display independently.
Step-by-step Validation Guide (Recommended)
- Switch your initialization from non-payment to payment page mode (as described in Step 2):
function initPayMonthly() {
  window.Uplift.Payments.init({
    locale: "en-US",
    currency: "USD",
    checkout: true,
    channel: "desktop",
    container: "#up-pay-monthly-container",
    onChange: myOnChangeCallback
  });
}
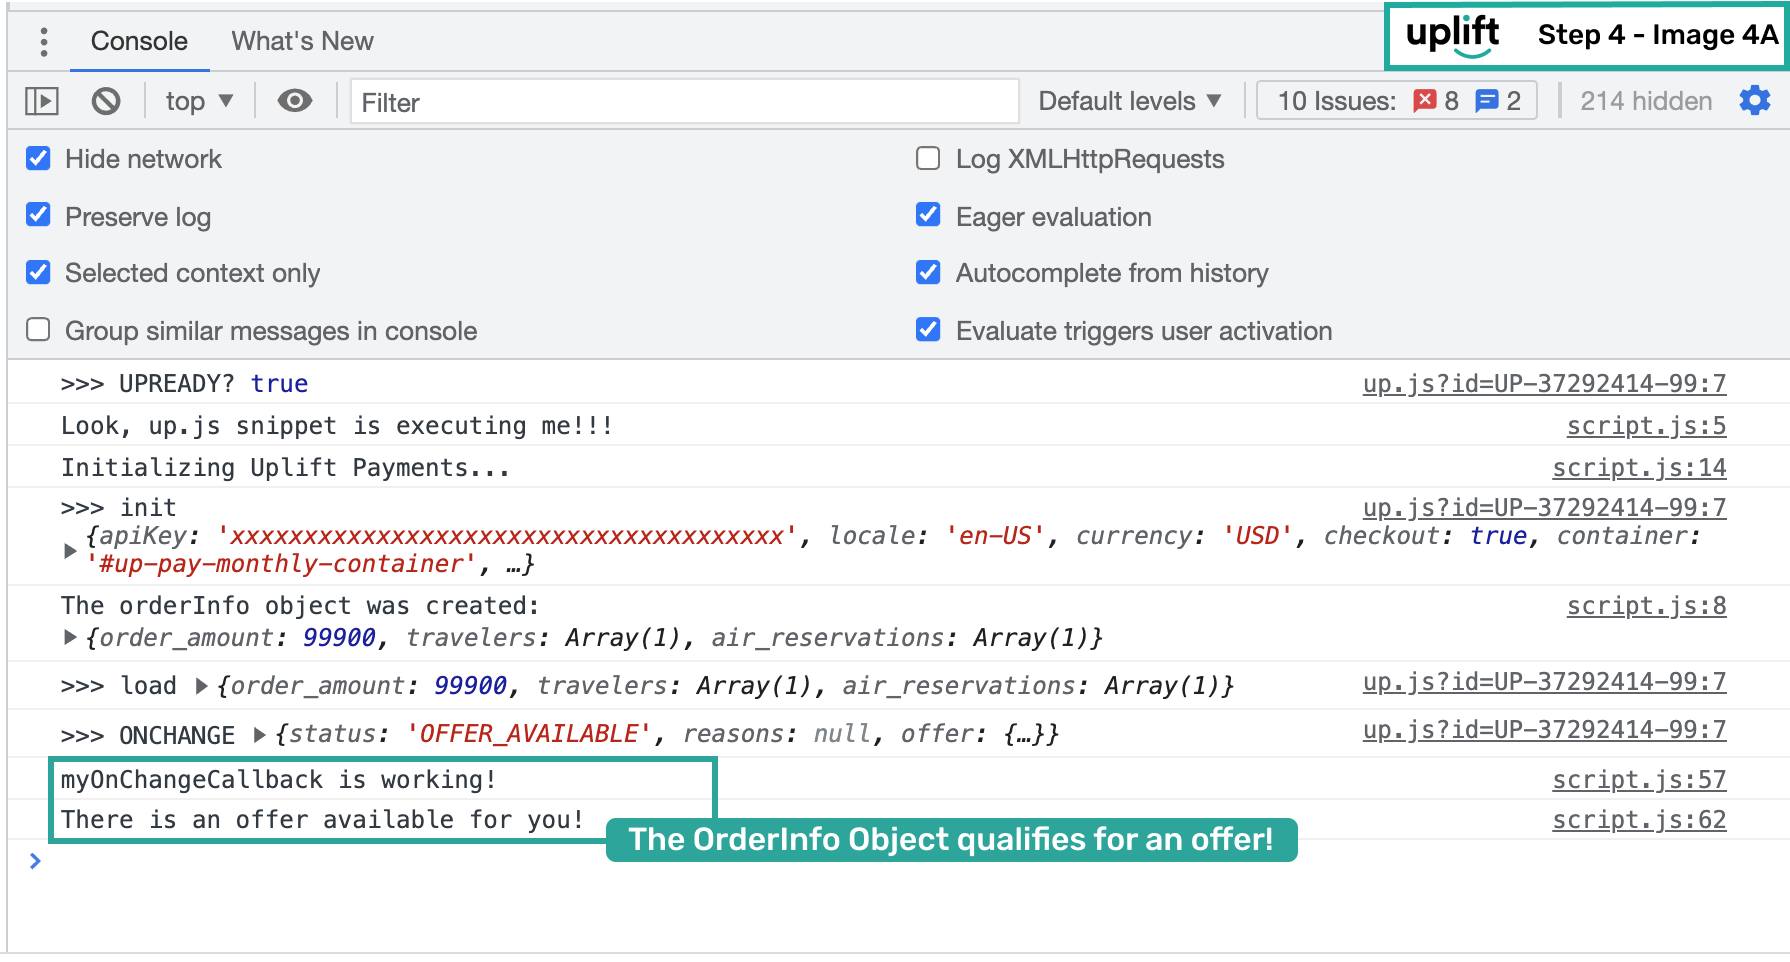
- Define the callback handler with console logs to see each status:
function myOnChangeCallback(response) {
console.log("myOnChangeCallback is working!");
var statusHandlers = {
OFFER_AVAILABLE: function(){
console.log("There is an offer available for you!");
},
TOKEN_AVAILABLE: function(){
//Uplift application has been completed and ready to pay in full.
},
TOKEN_RETRIEVED: function(){
//Uplift Payment Token successfully retrieved.
},
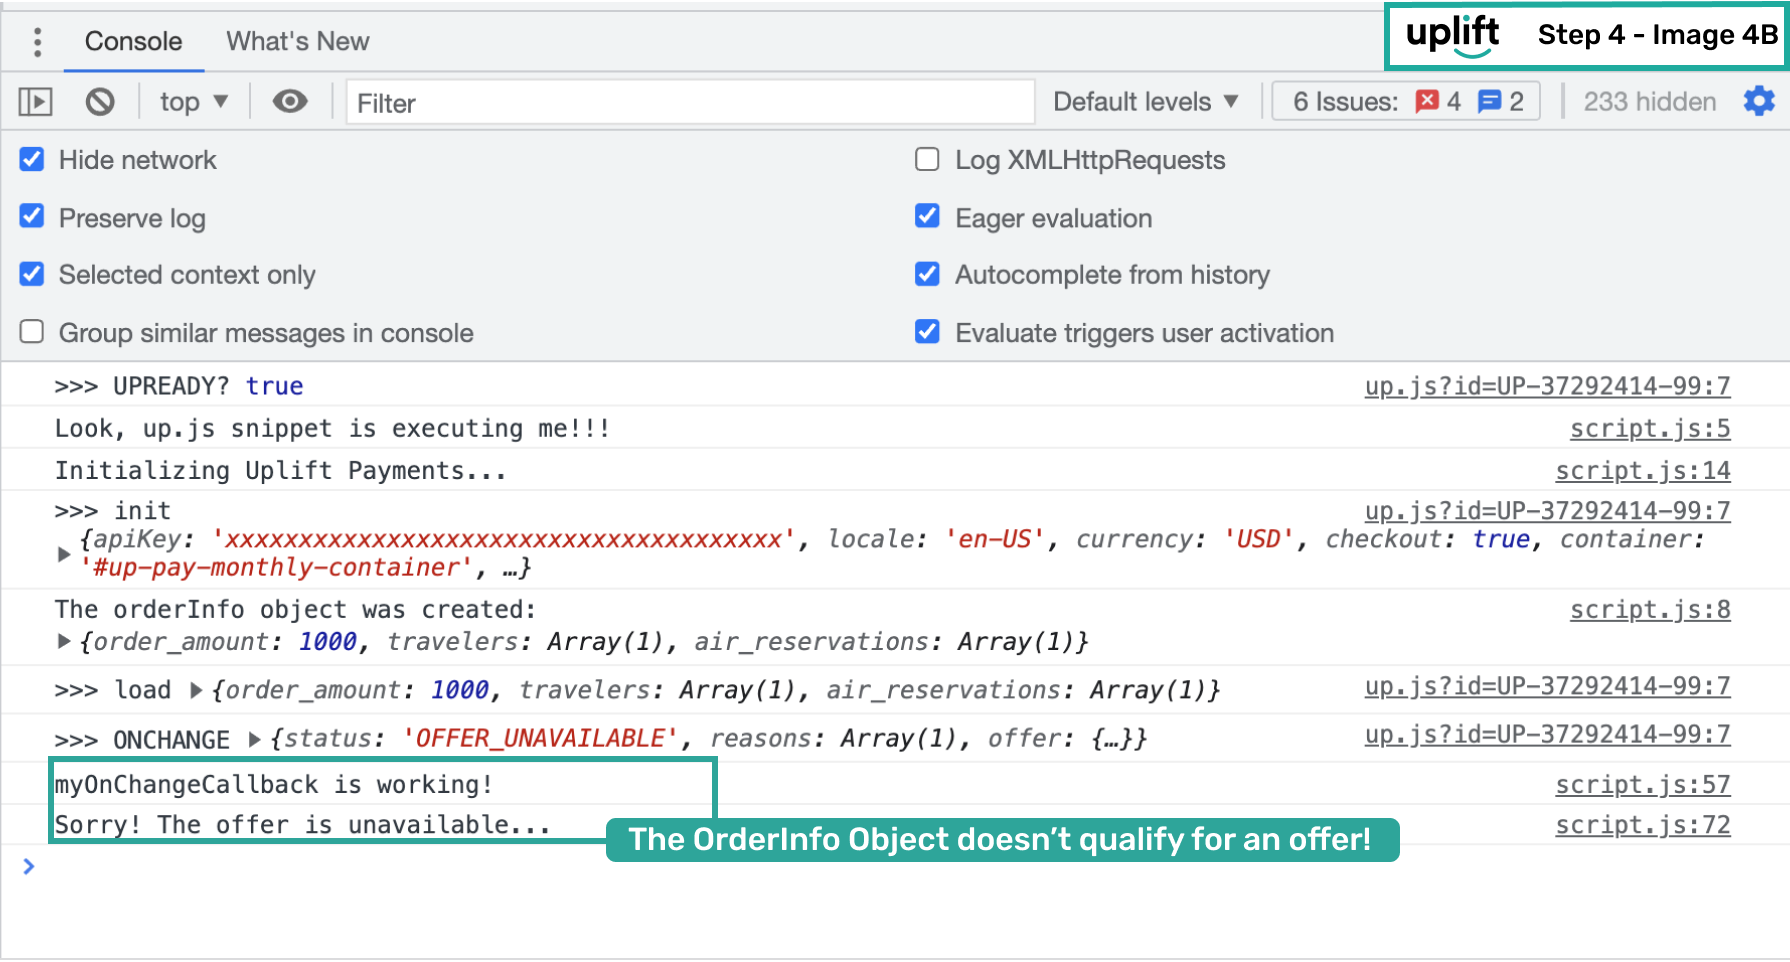
OFFER_UNAVAILABLE: function(){
console.log("Sorry! The offer is unavailable...");
},
SERVICE_UNAVAILABLE: function(){
console.log("Sorry! The Uplift service is unavailable...");
}
};
statusHandlers[response.status]();
}
- Refresh the page and check the console. With a qualifying order amount, you should see the
OFFER_AVAILABLEstatus logged:
-
To test an unavailable offer:
- Change
orderInfo.order_amountto1000($10.00 — below the minimum threshold). - Refresh the page or call
window.Uplift.Payments.load(orderInfo). - Confirm you receive
OFFER_UNAVAILABLE:
- Change
- Inspect the Network tab for response details including error codes and offer content:
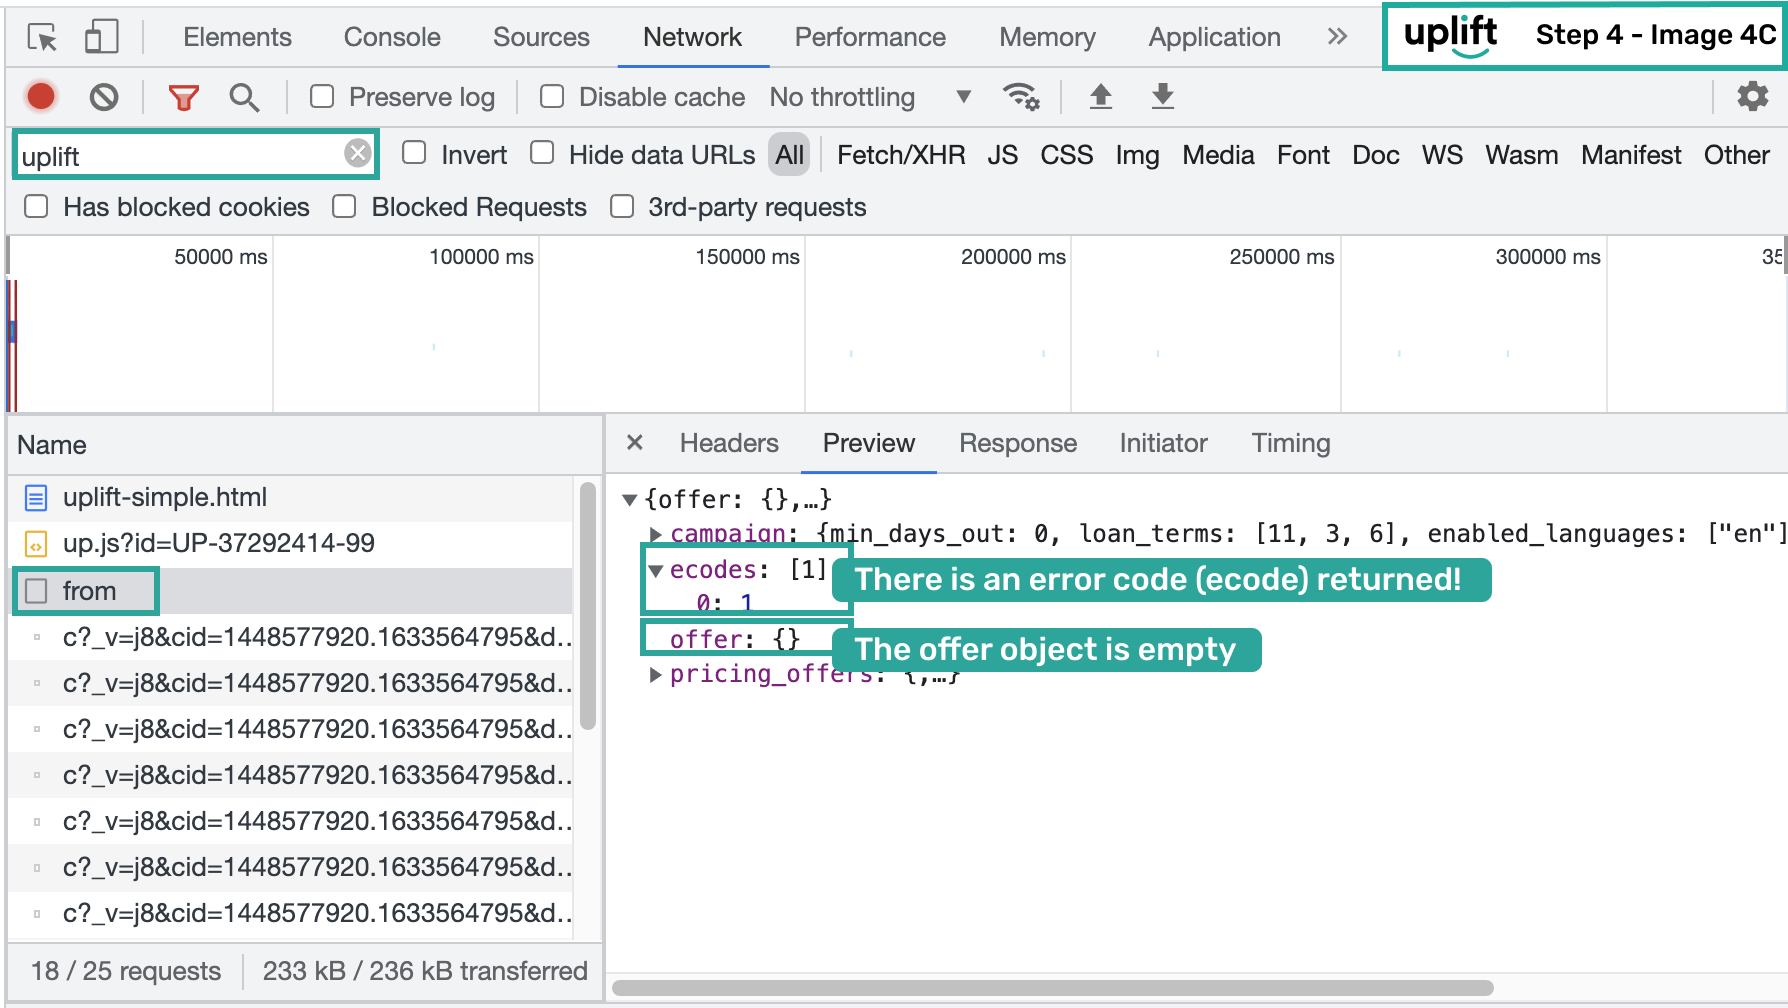
In this case, error code 1 means order_amount is below the minimum threshold.
📘 For detailed explanations, see: payment status, token reference, and error codes.
Continue to Step 5: Setup Flex Pay iFrame to embed the Flex Pay application on your payment page.