Overview
⚠️ Steps 4-6 are exclusive to payment pages. If you are building a non-payment page, skip to the Enable User Interface Section to configure your <up-from-pricing> components.
This is the final step of the payment flow. After the customer completes the Flex Pay application through the iFrame, you retrieve a virtual card token and process payment - just like any other credit card.
Integration Details
After the customer finishes the iFrame application, there are two possible outcomes:
1. Adverse Action (Not Approved)
- The iFrame displays a message suggesting the customer use an alternative payment method.
- The payment selector remains enabled, but the customer cannot continue with Flex Pay.
- The callback handler stays at
OFFER_AVAILABLEstatus. Due to compliance requirements, the specific application outcome cannot be disclosed.
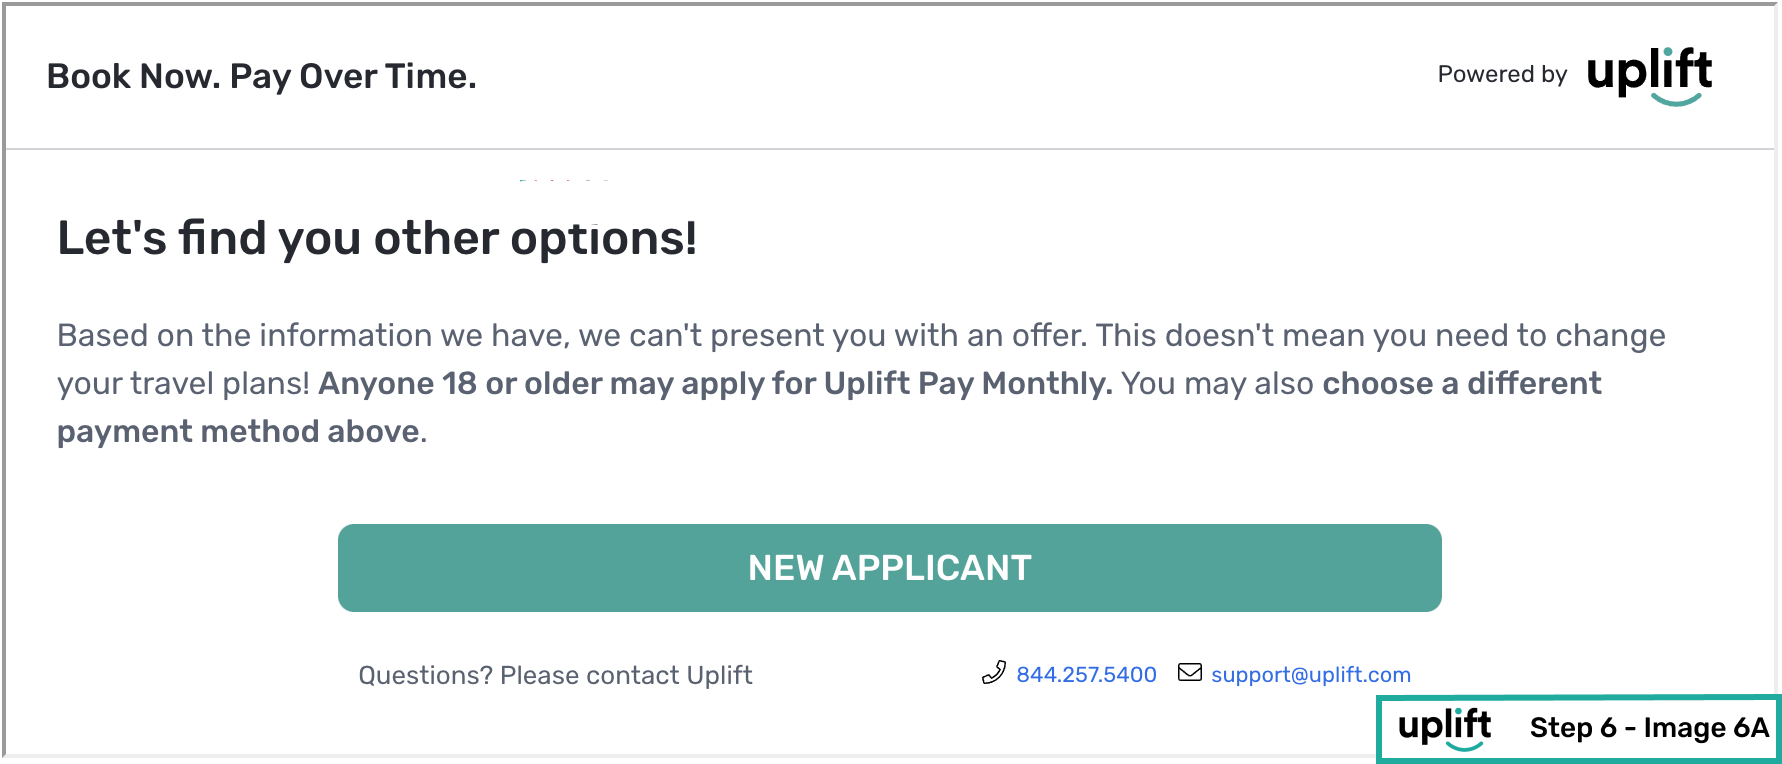
Note: For travel partners, declined applicants will see a button to start a new application for a different user.
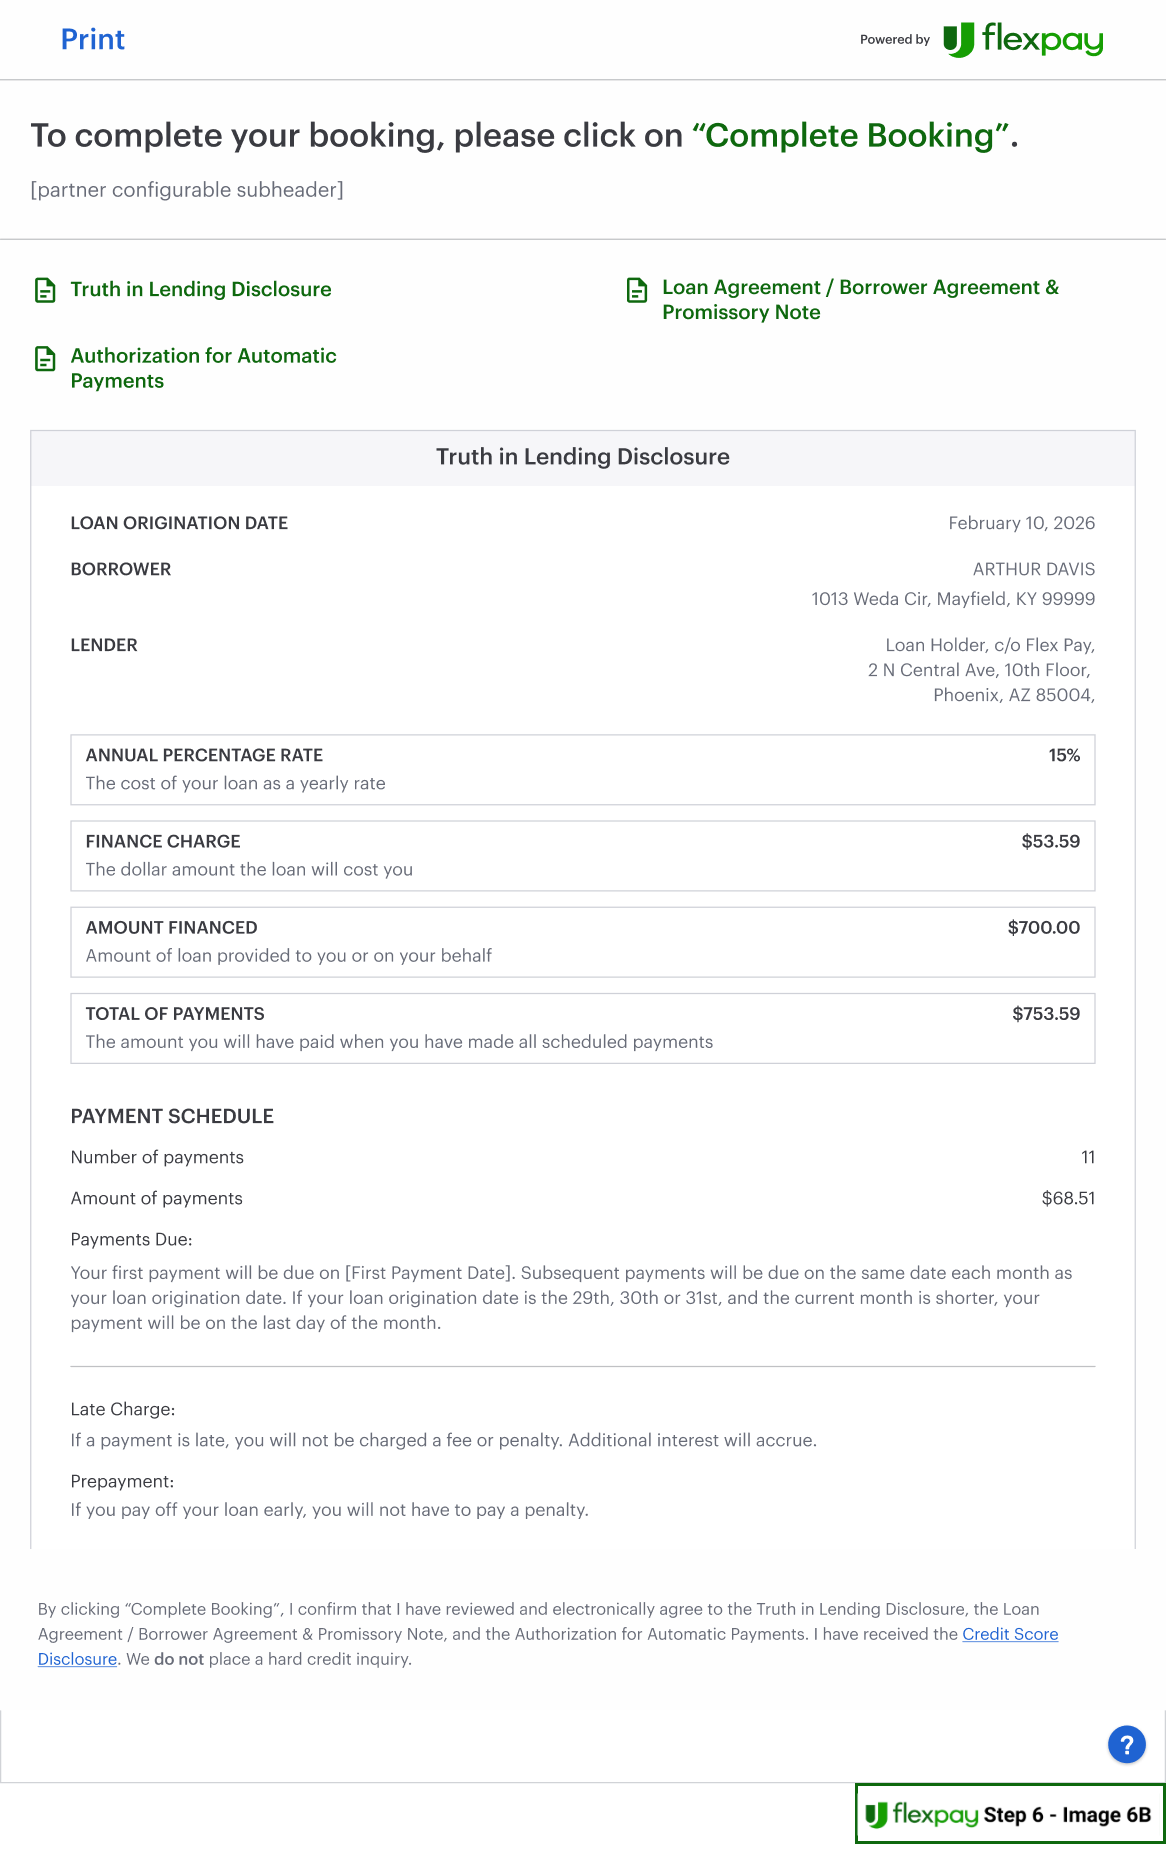
2. Successful Application (Approved)
-
The callback handler fires
TOKEN_AVAILABLE, signaling that a virtual card is ready.⚠ Retrieve the token only after the customer clicks your booking/purchase button. Do not auto-retrieve on
TOKEN_AVAILABLE.Call
window.Uplift.Payments.getToken()(no parameters) to request the virtual card from the Flex Pay platform. -
The callback handler then fires
TOKEN_RETRIEVEDwith the token in the response. Use this token to process payment exactly as you would with any other bank card.📘 Detailed token attributes and usage: Token Reference. If the token value is NULL: Response Reason Codes.
⚠️ Do not store or display the token. Once obtained, card information must not appear in:
- Billing contact forms
- Credit card forms
- Window objects
- Confirmation pages (not even last 4 digits)
⚠ For billing contact information, always use the data under token.contact instead of any other billing information provided by the user.
Here is the complete callback handler with token retrieval:
function myOnChangeCallback(response) {
  var statusHandlers = {
    OFFER_AVAILABLE: function(){
      //Uplift Pay Monthly Offer available for this customer.
    },
    TOKEN_AVAILABLE: function(){
      //Uplift application has been completed and ready to pay in full.
      //Retrieve the token ONLY AFTER Purchase/Book button is clicked.
      window.Uplift.Payments.getToken();
    },
    TOKEN_RETRIEVED: function(){
      //Uplift Payment Token successfully retrieved.
      var token = response.token;
      //process payment using token (uplift virtual card).
    },
    OFFER_UNAVAILABLE: function(){
     //Uplift Pay Monthly Offer is not available for this customer.
    },
    SERVICE_UNAVAILABLE: function(){
      //Uplift Payments Service is unavailable.
    }
  };
  statusHandlers[response.status]();
}
Error Reporting
⚠️ Exclusive to Flex Pay transactions.
If an error prevents the customer from completing a booking after payment was processed (for example, inventory sold out, payment provider downtime), report it to Flex Pay:
window.Uplift.Payments.error(errorMsg: String)
The errorMsg parameter is the error message shown to the user. Reporting these errors helps us improve the experience for your shared customers.
Processing Confirmation
After the payment is complete, send a confirmation to Flex Pay. This is required for both Pay Monthly and other payment methods.
⚠️ Execute confirm() only on the Confirmation Page.
window.Uplift.Payments.confirm(
  {
    "is_pay_monthly": boolean,
    "confirmation_id": "string"
  }
)
📘 confirmation_id is mandatory only for Pay Monthly transactions (is_pay_monthly: true).
Example

Pay Monthly
window.Uplift.Payments.confirm({
   "is_pay_monthly": true,
   "confirmation_id": "616783a0"
 })
Other Payment Methods
window.Uplift.Payments.confirm({
   "is_pay_monthly": false,
   "confirmation_id": "616783a0" //optional
 })
For Pay Monthly transactions, this confirms the booking was successful and allows Flex Pay to support shared customers. For other methods, it provides performance metrics.
📘 If your confirmation happens on the same payment page (rather than a separate page), make sure up.js is loaded, window.upReady is defined, and the library is initialized for a non-payment page as explained in Step 2.
⚠️ Review the Purchase Button page for the expected behavior.
⚠ Before launching Flex Pay on your Production site:
- Verify the checkout page and payment behavior meets Payment Status requirements
- Complete the QA Checklist
From Pricing After Payment Completion
After the payment flow completes, any <up-from-pricing> components still on the page (for example, in an order summary visible on the confirmation page) continue to display the last known offer. They do not require any manual cleanup - the SDK manages their lifecycle through the internal bridge.
Step-by-step Validation Guide (Recommended)
- Update the callback handler with console logs for token flow:
function myOnChangeCallback(response) {
  console.log('myOnChangeCallback is working!');
  var statusHandlers = {
    OFFER_AVAILABLE: function () {
      //Uplift Pay Monthly Offer available for this customer.
      console.log('There is an offer available for you!');
    },
    TOKEN_AVAILABLE: function () {
      //Uplift application has been completed and ready to pay in full.
      //Retrieve the token ONLY AFTER Purchase/Book button is clicked.
      console.log('getToken');
      window.Uplift.Payments.getToken();
    },
    TOKEN_RETRIEVED: function () {
      //Uplift Payment Token successfully retrieved.
      var token = response.token;
      console.log('This is your token', token);
      //process payment using token (uplift virtual card).
    },
    OFFER_UNAVAILABLE: function () {
      //Uplift Pay Monthly Offer is not available for this customer.
      console.log('Sorry! The offer is unavailable...');
    },
    SERVICE_UNAVAILABLE: function () {
      //Uplift Payments Service is unavailable.
      console.log('Sorry! The Uplift service is unavailable...');
    },
  };
  statusHandlers[response.status]();
}
- Refresh the page, call
window.Uplift.Payments.select()from the console, and complete a test application using the provided testing profiles (approved outcome). You should end at the following screen:
- The callback handler should have retrieved the token. Check the console:
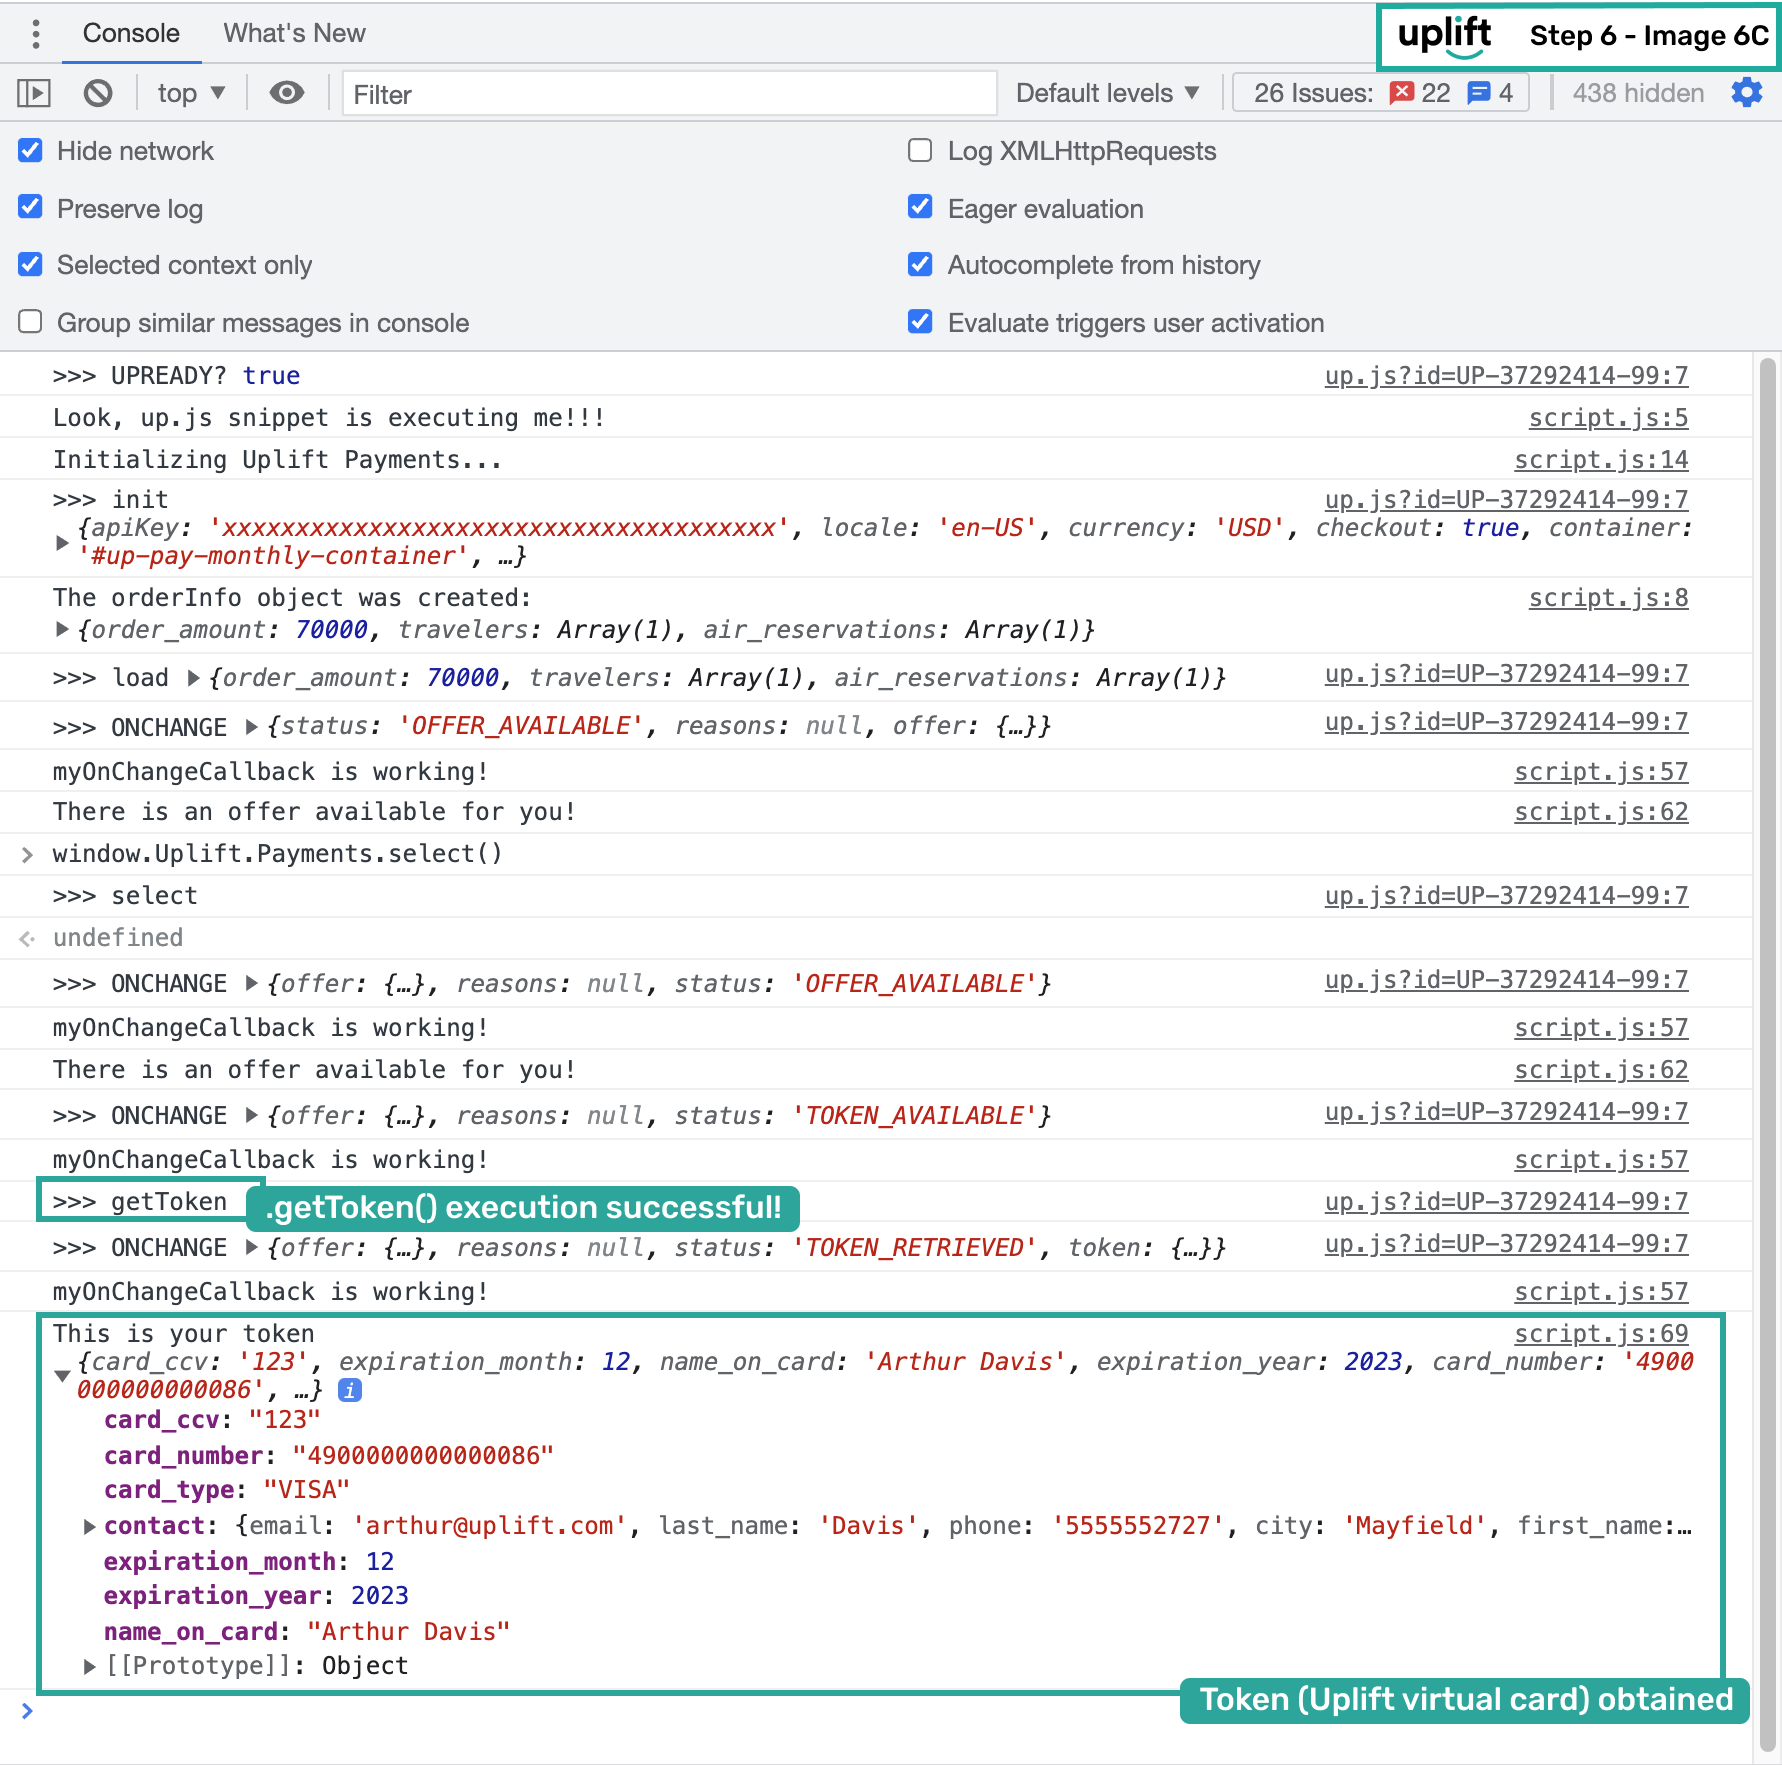
⚠️ Once you have the virtual card information, charge it as you would any other credit card to complete the transaction.
- Send the confirmation to Flex Pay with your booking reference:
window.Uplift.Payments.confirm({
    "is_pay_monthly": true,
    "confirmation_id": "ConfirmationID123"
  })
Replace ConfirmationID123 with the actual confirmation ID from your system. Sharing this allows Flex Pay to support your shared customers with any inquiries.
You have now completed the full Flex Pay payment integration. Continue to the Enable User Interface Section to configure <up-from-pricing> components and Pay Monthly Selectors for your customers.
⚠️ Before going live, replace your testing UP-code with the Production code and remove any console logs used during development.
⚠ Before launching Flex Pay on your Production site:
- Verify the checkout page and payment behavior meets Payment Status requirements
- Complete the QA Checklist